Thursday, November 14, 2013
Finding time to learn for a teacher
It amazes me how much we expect from teachers. Sitting here and looking at the life of a teacher from the eyes of a teacher and a parent I see so much. As a parent I unfortunately forget about my teacher eyes and forget how busy teachers are on a daily basis. As a teacher I wonder how in the world do we all stay sane? Testing, behaviors, planning, teaching and throw in learning because a teacher should never stop learning!
Now, as a technology coach for teachers I have established a new goal for myself - how can I make learning something that isn't a task for teachers? Teachers have a hard time finding "free time" to spend learning new tools. I've tried e-mailing teachers - what teacher actually has time to sit and read an e-mail that isn't at the top of their list (top of the lists would be parents, principals and other administration).
There are so many tools available to teachers but many don't have the time to sit down and look for these tools. Watch this blog for fun and easy to learn digital tools that you can use in your classroom.
Thursday, October 31, 2013
My Presentation Blog Post from EVSC ICATS Website
In the techie world we live in, there are endless possibilities to what teachers and students can do to liven up a presentation! Today, I would like to share with you Blendspace.

Blendspace is an online presentation application, formerly known as Edcanvas. I personally love the new name because it really describes what a user can do - blend different things together to make a very creative presentation.
Create an Account
You will first want to create an account.
- Go to www.blendspace.com
- Click on the blue Sign Up button

- Who are you?

- Choose I'm a Teacher
- Follow the steps to creating your account
Now you are ready to start. If you plan to use this as a classroom tool you can setup classes on your account and pass the class code out to students. Once you have successfully created your account and logged in you should see a screen similar to this:

Create a Class
To create a class - just click on Classes. You will then see:

Choose the grade level and name your class. Once the class is created you will receive a class code to give to your students. Students will create their accounts exactly like you but they will choose I'm a student and when prompted will enter your class code.
Now that you have all the "business" out of the way you can start creating lessons. Blendspace calls all the creations lessons. These lessons can be created in your account and also shared with specific classes that you have created.
** When students are creating a lesson for your class, make sure they select the class when the first begin creating. **

Create a Lesson
Let's walk through creating a lesson and all the features of Blendspace.
Click on New Lesson - the next window will be

The parts of a Blendspace lesson:
- Templates: There are five templates to choose from

- Themes: Two color themes. The only color that changes is the color behind each section heading. (Dark or colors)
- Play: This is the feature you will use will presenting your Blendspace lesson.
- Print: If you choose to print your lesson.
To search for what you are looking for, first select what you want to insert (example - YouTube), then type in a search word. I am creating a Blendspace lesson on Halloween so I searched Halloween kids songs.

Now I just simply click on the video I want (I can preview it right in the search box before using it, too) and drag it to the spot I want to place it.

*** To add additional rows to your lesson, click on Add Row underneath the lesson template:

Share Your Lesson
Now - once you have gotten everything you want placed onto your Blendspace lesson it is time to share it. If you created it for your class you will share as follows:
Click on Share in the top right corner and a new window will pop up.

For your class - click on the class you want to share it with.
For others - you can share via Edmodo, Facebook, Twitter, email, grab an embed code for your blog or website or share the QR code with anyone!
Happy Blending!! http://blnds.co/1clLJCy
Monday, August 19, 2013
Digital Citizenship
Digital citizenship: using electronic technology responsibly.
What does this mean to us as adults? It doesn't just mean to teach this to young people but it also means practice it. This takes us WAY back to the old saying, "Practice what you Preach!"
As a technology coach I work with our team to help develop resources to enforce the importance of good digital citizenship for students. As a parent, it is also my responsibility to reinforce these types of lessons at home AND to demonstrate the same.
Recently I noticed a post on Facebook, actually many times but this time it hit home more, that shot negative accusations at an individual. To me, this is not setting a good example for the children involved and it is also promoting that showing disrespect for this adult is okay. How do adults expect children to learn appropriate ways to handle difficult situations if they can't themselves.
Okay, so I am on a rant I suppose. It is so important for us to always remember a few simple things when using electronic technology:
- be respectful
- online outlets are not the way to solve conflicts, talking it over is always the best
- be truthful
- don't say anything unless you know all the facts to back up what you are saying
- people are the users of technology
- people have feelings
- technology does not have feelings
Let's make it a point to practice what we preach - lead a good example for our children. Don't use electronic technology to hide behind your emotions.
Tuesday, July 30, 2013
The Cloud
"The Cloud" is a phrase that is used quite often in today's tech world but what does it really mean? When I think of a cloud the image of a white fluffy object comes to my mind. A real cloud is something out in the sky and it really is full of something. A tech cloud is full of information that you or another user has created. The tech cloud gives an individual mobility, the ability to collaborate and frees up space on your actual computing device.
Cloud applications can be split into categories:
Cloud applications can be split into categories:
- storage & share
- Dropbox
- Flickr
- Picasa
- create, collaborate, store and share
- Presentation Applications
- Google Apps/Drive
- Zoho Show
- Prezi
- Educanvas
- Glogster
- Animoto
- Present.Me
- Voice Thread
- Word processing/Spreadsheets
- Google Apps/Drive
- Zoho Show
- SkyDrive
I'm sure there are plenty of other applications out there, these are just some that I am personally familiar with and have used frequently.
Before you make the decision to move to a cloud based storage system - think about what it is you are wanting to create/store. Is it highly confidential information? The cons of cloud based storage/creation is the fact that you aren't 100% sure of the security level. In my field of work - cloud based applications work great. It allows me to create something from any device that I used and from anywhere I have an Internet connection. Another con - you rely on the availability of the Internet. As with any technological tool - you will probably run into technical difficulties on occasion.
Please watch my blog for posts that focus on the individual applications mentioned above!
Monday, July 8, 2013
It takes two to tango
Did you ever hear the phrase, "It takes two to tango?" Well - it might take 3 or 4 when working on a powerful presentation! I don't mean 3 or 4 people, although two heads are better than one, but I mean put multiple tools to work to create one Powerful Presentation!
I will be presenting "Blending Applications" this week at the eRev conference in Evansville, IN.


I will be presenting "Blending Applications" this week at the eRev conference in Evansville, IN.
I am excited to share my ideas of how you can take a simple blog and add video, audio, images and much more - stay tuned for more details! In the meantime try to create a
Getting ready for the week
This week is full of teaching, conference and presentations. I will be teaching Intro to PowerPoint tomorrow
Introtopowerpoint from jengossman
As I continue to finalize my presentations I will be posting them here as well! Have a great week!
As I continue to finalize my presentations I will be posting them here as well! Have a great week!
Wednesday, July 3, 2013
Edcanvas - digital poster
 I know that many of you reading this blog have at least been introduced to Glogster. Students love Glogster and the age of the student doesn't seem to matter. It is fun because they can create a digital poster and things are posted in all different ways. Edcanvas is the new big thing and I compare it to Glogster. I recently attended ISTE 2013 and was able to meet two of the developers of Edcanvas. That was exciting for me. Amy and Harrison were wonderful and so excited about their new product. Let's get started creating!
You first want to sign up for an account at http://www.edcanvas.com/. They have a free version and there is also a paid version. The paid version is marked down to $3.00/month for a limited time - a $5.00 discount off their regular rates. In the paid version you can record audio and collaborate:
 I am finding the free version to work for me at this time so it is a personal choice for each individual.
There are a few things to take care of first. If you plan to use this with your class you will need to establish that first. So, after logging in - just click on Classes: 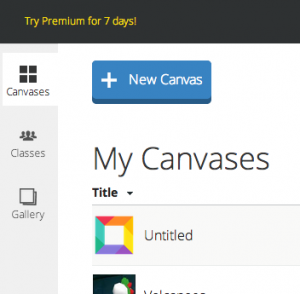 In the Classes section you will choose your grade level and name your class. After that you will be given a class code (similar to the Edmodo setup). This class code is what you give your students so when they create their accounts they can join your class!
 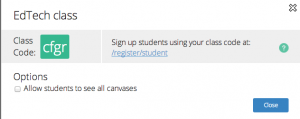 When your students create their account they will choose Student instead of teacher. It will ask for the class code.
 In the Classes section you will choose your grade level and name your class. After that you will be given a class code (similar to the Edmodo setup). This class code is what you give your students so when they create their accounts they can join your class!
  When your students create their account they will choose Student instead of teacher. It will ask for the class code.
Now you are ready to start creating. Click on  and start.
and start.  At the top you will see the options Templates, Themes, Play, Print and Autosave. Templates are the way your canvas is laid out and there are five options:
Themes are your two color scheme options: 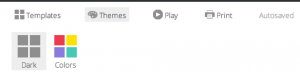

The Play feature is for when your canvas is complete. Also notice you can add a row at the bottom to make your canvas bigger.
Now that the basics are out of the way - how do you add content? Easy as pie!
On the right of your screen you will see  . You simply choose the content style you want (YouTube, Google, Flickr, Website, etc) and search from within Edcanvas. I'm going to search the Internet for the Fourth of July images (appropriate theme this week!). I will click the G (Google Search) and type in Fourth of July.
 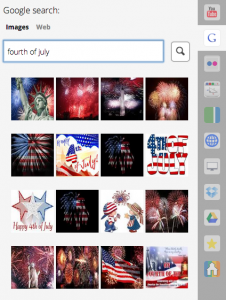 Now I will choose an image, drag it and drop it onto my canvas! EASY! If I want to put a website on a tile I need to know the website first, then click on the globe and type the website (or paste) into the box.
 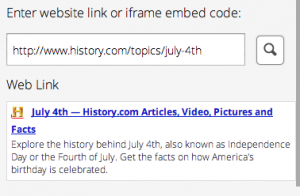 Just like the image - I click, drag and drop. I can add my own text or even create a quiz!
 . You simply choose the content style you want (YouTube, Google, Flickr, Website, etc) and search from within Edcanvas. I'm going to search the Internet for the Fourth of July images (appropriate theme this week!). I will click the G (Google Search) and type in Fourth of July.
  Now I will choose an image, drag it and drop it onto my canvas! EASY! If I want to put a website on a tile I need to know the website first, then click on the globe and type the website (or paste) into the box.
 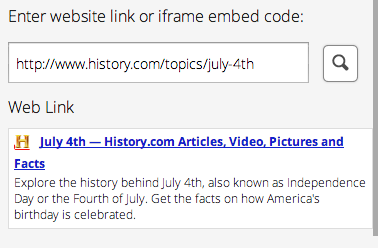 Just like the image - I click, drag and drop. I can add my own text or even create a quiz!
When I am finished I simply share, or play, with whoever I want to view it! The wonderful developers at Edcanvas give us several ways to share:
 Happy creating! Fourth of July
Subscribe to:
Posts (Atom)